Author - Mr Vik Veer ENT SpR - March 2009
This site is not intended to be used by people who are not medically trained. Anyone using this site does so at their own risk and he/she assumes any and all liability. ALWAYS ASK YOUR SENIOR IF YOU ARE UNSURE ABOUT A PROCEDURE. NEVER CONDUCT A PROCEDURE YOU ARE UNSURE ABOUT.
Guide to Cortical Mastoidectomy
This is a simple guide to performing cortical mastoidectomy. This should be used as start to understanding how to practice whilst on a temporal bone course or understanding an operation you are observing.
Below is a picture of a ear (cadaver specimen)
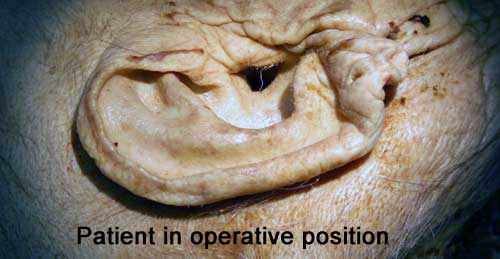
We will start with a post auricular incision, and before you will be the ear
which you need to pull forward to expose the mastoid area (see picture below).
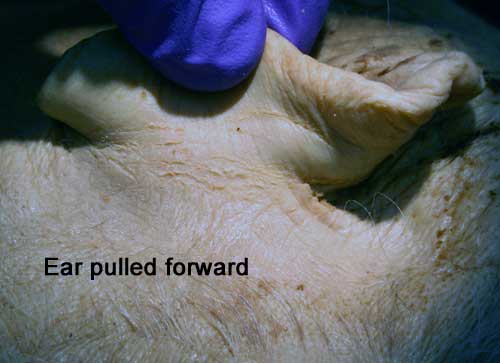
Feel this bone on yourself to give you an idea where it is. The idea is to make an incision that follows this bone down near the tip and gently curves around the posterior ear crease. Don’t allow your incision to go into the post auricular crease as that will be:
- Difficult to suture up at the end
- Results in poor wound healing
- Makes it harder to expose the mastoid bone properly
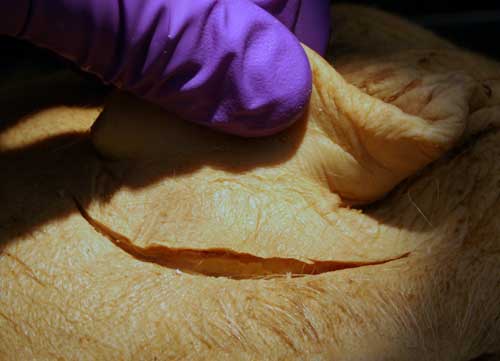
As you dissect down through the skin, and the post auricular muscles you will come to a fibrous layer (periostium) which you should follow forward and expose your area. If you need a temporalis fascia graft you can collect it at this point from the superior end of the incision (I will cover this in the endaural incision guide). Keeping the periostial plane can be useful at the end when suturing this back as it ensures the ear returns to its correct position. Extend this flap forwards until you near the ear canal. Put your finger in the canal to make sure you don’t injury it and you know how far you have to go.
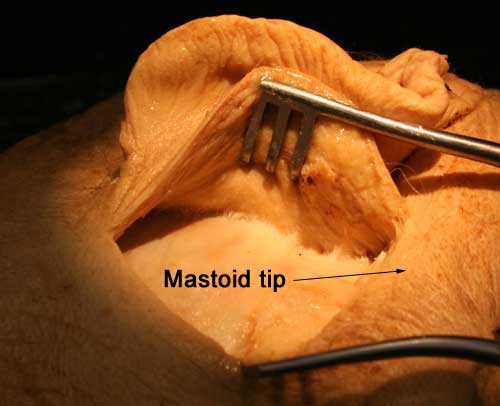
At this point you can incise the periostial layer and expose as widely as you can.
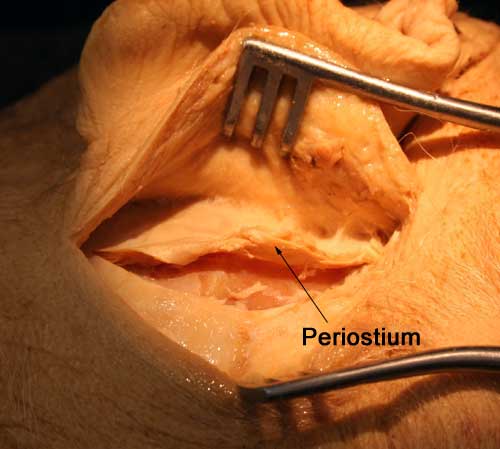 You need to expose the mastoid tip, the temporal line, the root of the zygoma, the posterior lip of the external ear canal and the rest of the mastoid bone. Use a periostial elevator to scratch the periostium off to leave the bone as clean as possible. At this point you will normally see most of the landmarks needed to continue.
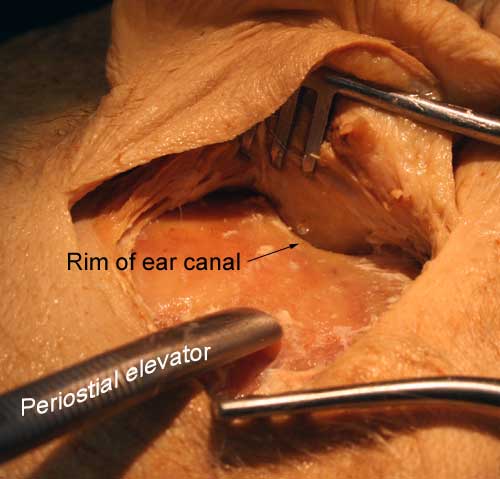
The spine of Henle is a small out crop of bone just within the ear canal at the inferior posterior corner. This roughly marks the spot deep to which the mastoid antrum will be found. Sadly this is not visible on the image below. The temporal line is a small ridge of bone that is the continuation of the zygomatic arch as it attaches just above the ear canal. This line is the attachment of the temporalis muscle and also the level of the dura in the middle fossa of the brain. We clearly need to stay inferior to this and not breach this layer as it will cause a CSF leak.
The first step therefore is to pick up the largest cutting burr available (size 5?) for your drill and with plenty of irrigation and wide bore suction, drill just inferior to this line. Use the ‘equator’ of the burr rather than the tip. This is point of maximal cutting, and the fastest point on the burr. Hold the drill firmly but don’t press hard on the bone. Allow the burr to cut the bone using minimal effort. Using the tip or pressing too hard will frequently cause the drill to jump off the bone dangerously. A slow methodical approach is best.
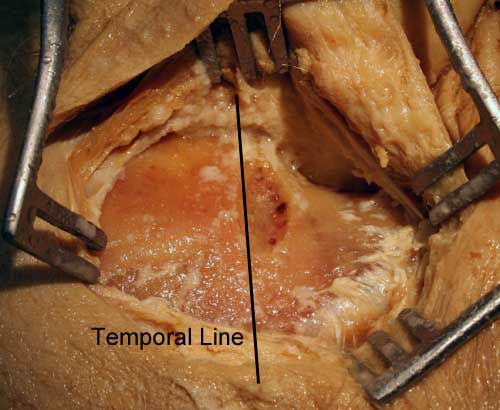
The next step is to make another line at right angles to your first cut and descend down towards the mastoid tip, staying just posterior to the ear canal. Always use the same drilling technique as mentioned before. You may need to change position to do this comfortably with control.
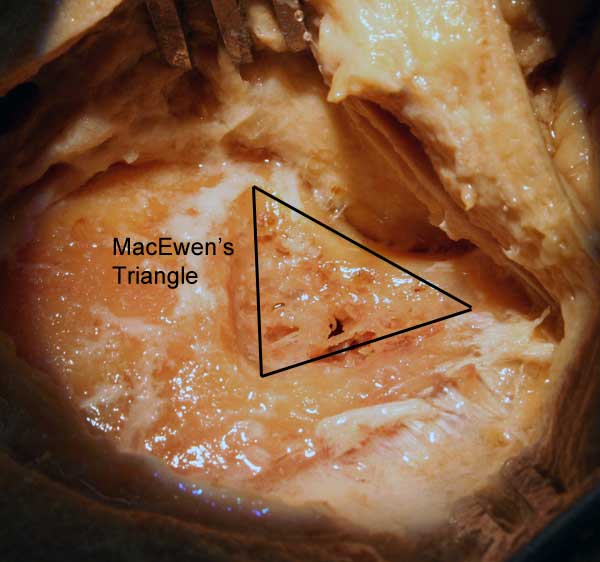
You should have a ‘V’ shape now which when the free ends are joined marks out MacEwans triangle which helps you stay within the mastoid cavity.
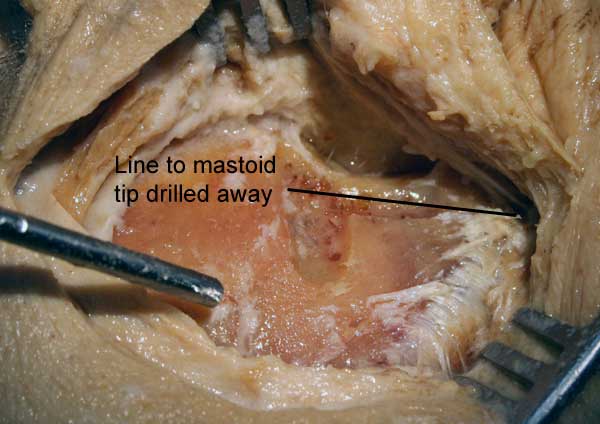
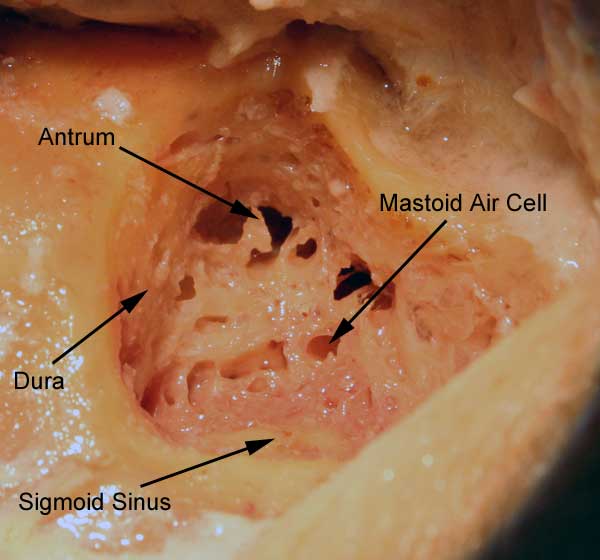
Drill within this triangle and work your way deeper into the mastoid. You will start to see mastoid air cells in normal bones, which can give an element of reassurance. Don’t fall into the mistake of following air cells, you should be always mindful of your landmarks and use these to guide your progress.
There are several structures you need to avoid when drilling into the mastoid cavity:
- The sigmoid sinus is located in the posterior border of the mastoid cavity. Drilling into this will obviously cause a terrible bleed and must be avoided. The sinus bulges out of the posterior wall and looks slightly blue when you drill near it. This explains the reason you need to irrigate well as you drill so you can see these subtle signs as you work.
- The angle between the sinus and the dura wall is called the sinodural angle and this should be drilled to a safe point. You can use the mastoid tip to guide your dissection in this area.
- The dura wall has already been mentioned, this is slightly harder and bleeds a bit more than the normal mastoid cavity. If you see this you know you are close to the wall and you can try and slowly expose the rest of the wall.
- The extremely delicate facial nerve and corda tympani nerve are found in the anterior wall of the mastoid cavity and are extremely important.
- The labyrinthine structures are in the floor of the mastoid cavity (the deepest part) with the jugular bulb and even deeper structures like the endolymphatic sac and internal auditory canal that can also be damaged in this area.
Avoiding damaging these structures are important to completing the operation safely. There are some useful tips that may help your dissection:
- Using a diamond paste burr rather than the cutting burr is useful when you are coming up to delicate structures as it is not as destructive as the cutting burr. It also has the advantage of stopping bleeding or oozing (particularly from the dural wall). The disadvantage of using this drill is that it is so slow so only use it if you are very close to structures such as the facial nerve.
- Sweep your drill along the course of a structure you are trying to avoid damaging, rather than going across which may result in transecting a nerve.
- Always visualise what you are drilling rather than drilling around corners and not knowing what you are actually doing. For this reason it is often better to drill from inside to out rather than advancing a drill into a space and therefore not being able to see around the burr.
- ‘Saucerising’ is the name given to rounding off the edges of the cavity as you advance. This firstly allows you to expose the mastoid cavity better by allowing you to visualise important structures and secondly this encourages the cavity to close up during the healing process.
With the dura, sinodural angle, sigmoid sinus and mastoid tip all exposed you should now be able to extend your dissection slightly towards the zygomatic root (superior posterior to the ear canal) below which the antrum will be found. Staying close to the dura, work your way down until you reach the antrum which is an open space of variable size leading into the middle ear. Be careful here as the short process of the incus will pointing towards you and the second genu of the facial nerve is located just deep to its tip. The incus is normally seen in the superior border of the antrum with the tip of the short process of the incus pointing towards the sinodural angle. You must not touch the ossicular chain as the vibrations from the burr would travel down to the stapes and may cause sensorineural hearing loss.
The floor of the antrum is roughly at the same level of the labyrinth which is encased in a much harder whiter bone. The horizontal semi-circular canal is normally the first canal to be found. The start of the descending portion of the facial nerve lies directly anterior to this canal.
The facial nerve continues to descend towards the mastoid tip skirting along the anterior wall of the mastoid cavity. There are cells deep to the facial nerve (retrofacial cells) but if they are not diseased it is probably better to leave them alone to avoid having a mastoid cavity with a high facial ridge. This would leave a non-cleaning cavity that would constantly discharge and give your patient problems.
Further Reading
Otolaryngology Houston - good pictures of sigmoid sinus and a completed mastoidectomy
Temporal Bone Surgical Dissection Manual by Ralph Nelson - is an excellent book and a worthwhile purchase